
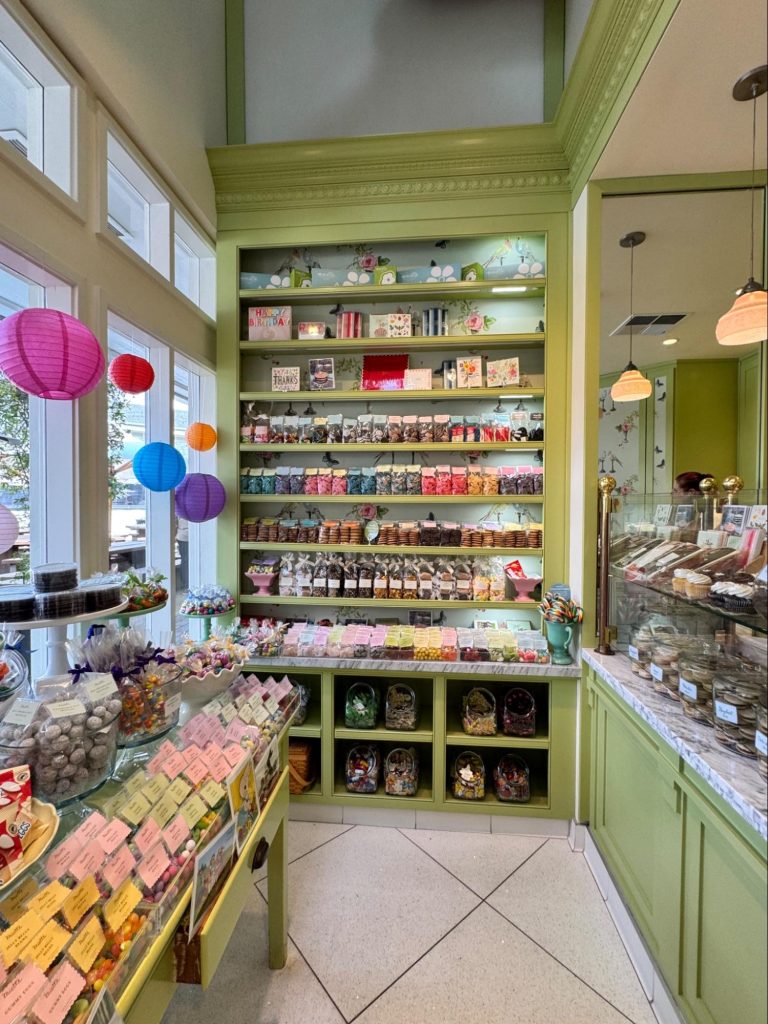
Photo credit: MetaphorDesign.com, Location: Miette, Marin County, California
Wood Highlights: Moulding with duo grooves placed at edge of S4S shelving at front with wallcovering at back, aligned edges, and crown moulding stacked above
Time for a Shelfie: Upgrade Your Shelving with Shelf Moulding
Shelving isn’t just about storage—it’s an opportunity to elevate your space with style and sophistication. Whether you’re designing built-ins, floating shelves, or a freestanding bookcase, adding moulding (or molding) to your scheme transforms basic shelving into a custom statement piece.
With the right trim moulding, you can create a look that’s sleek and contemporary, traditional and elegant, or bold and architectural. From edge details to vertical dividers, crown moulding to back panel enhancements, there are a variety of ways to use moulding to enhance shelving design. Let’s explore how moulding details can take your shelves from functional to fantastic.
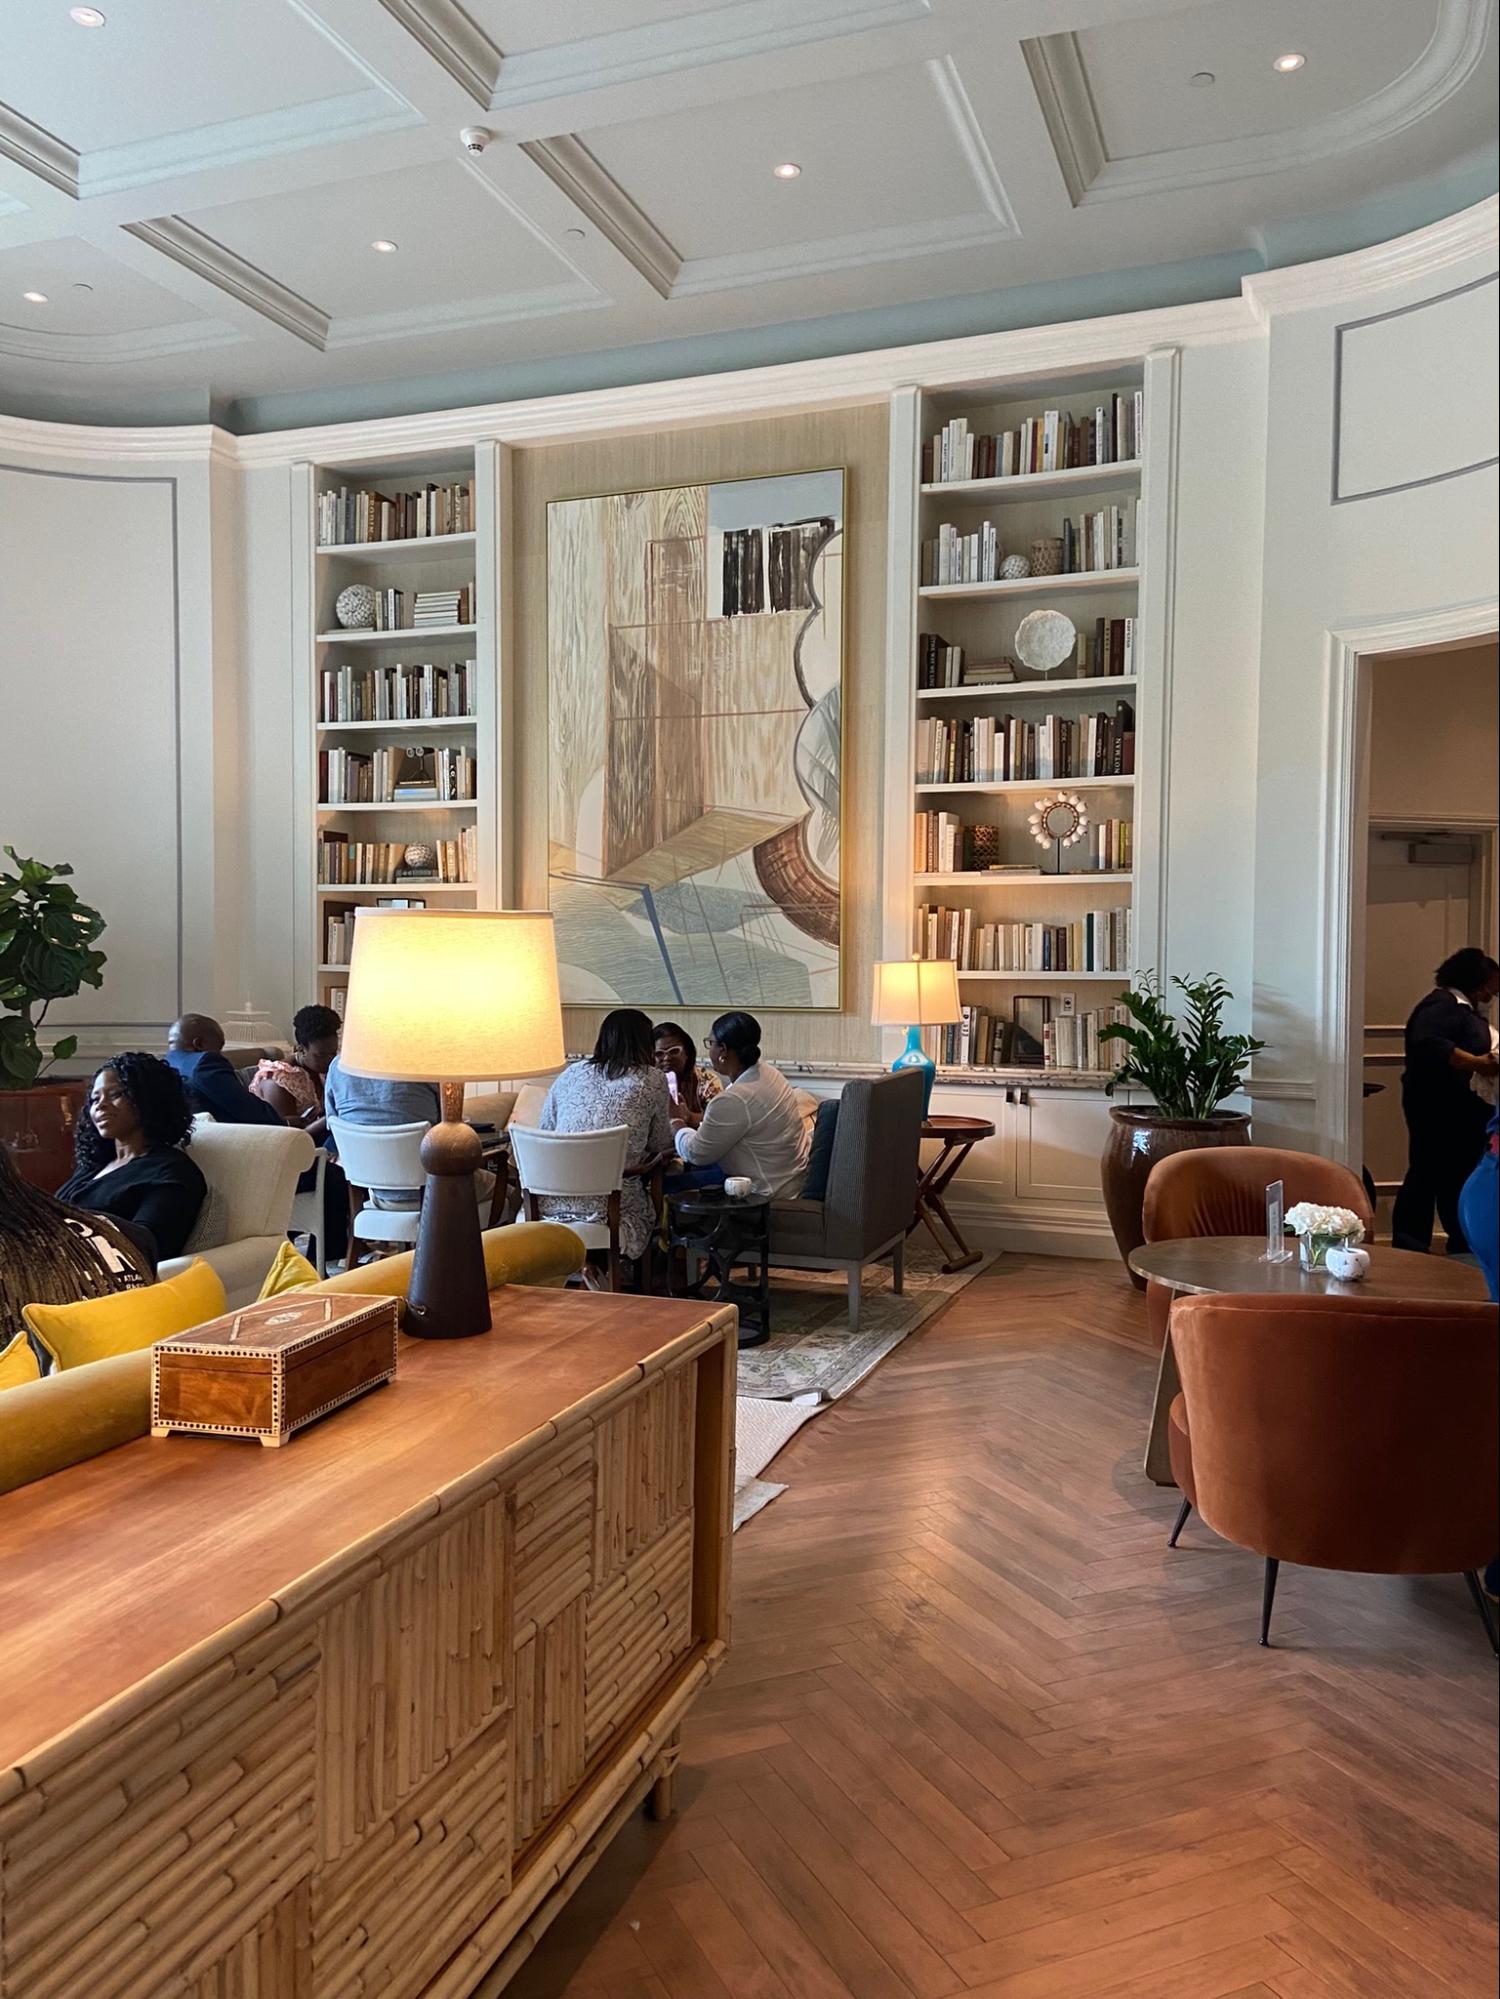
Photo credit: MetaphorDesign.com, Location: The Library at Rosewood Baha Mar, Nassau, Bahamas,
Wood Highlights: Trim at shelving edges, vertical trim, crown moulding, boxed ceiling at this library enhanced cafe
Edge Trim: The Key to a Custom Look
The edge of your shelving is one of the most noticeable details, making it a top priority for an upgrade. The height of the edge moulding you choose is the first step as it directly impacts the style and functionality of your shelves:
•½” to 3/4” high flat eased edge moulding is subtle and refined, aligning with the shelf itself to maintain a contemporary, minimalist look. Offset it to hide lighting or create a lip to prevent items from slipping off.
•1” to 2” high flat moulding is a bolder choice, giving shelves a stronger, more defined presence while reinforcing the overall structure.
•3” or more creates a modern, sculptural effect that visually reduces the sense of clutter, allowing books and decorative objects to appear more curated and intentional.
With various edge moulding options—like flat trim for a crisp look, ogee moulding for elegance, or reverse ogee for a subtle twist—you can tailor the perfect finish for your design. After thinking about the height of the edge and placement, consider how the ends meet. Miter the end with a vertical element, or butt up the two pieces whether making them more pronounced, flush or set back.

Photo credit: MetaphorDesign.com, Location: Lounge & Library, St. Remy, France
Wood Highlights: Vertical trim at shelving sections with crown moulding for a classic look
Vertical Moulding Between Shelving Units: Extra Detail That Stands Out
One technique for enhancing shelving design that professional designers like to employ is adding vertical moulding between each section. This not only provides structural definition but also creates a refined, built-in aesthetic that makes your shelving feel like a custom installation.
•Flat vertical trim keeps the design clean and modern while subtly separating each section of shelving.
•Ogee or reverse ogee vertical moulding adds soft, decorative detail for a more traditional or transitional look.
•Fluted or reeded moulding introduces texture and dimension, making your shelving a true design feature.
Placing vertical moulding between shelving units adds depth, rhythm, and architectural interest—perfect for breaking up large sections of bookshelves or creating visually distinct compartments for books, décor, and collectibles. Emphasizing the verticality of a bookcase works well with almost every style of interiors. Emphasizing the horizontality of a bookcase works well in mid century interiors and contemporary interiors where there’s an overall intention to make the room feel expansive.
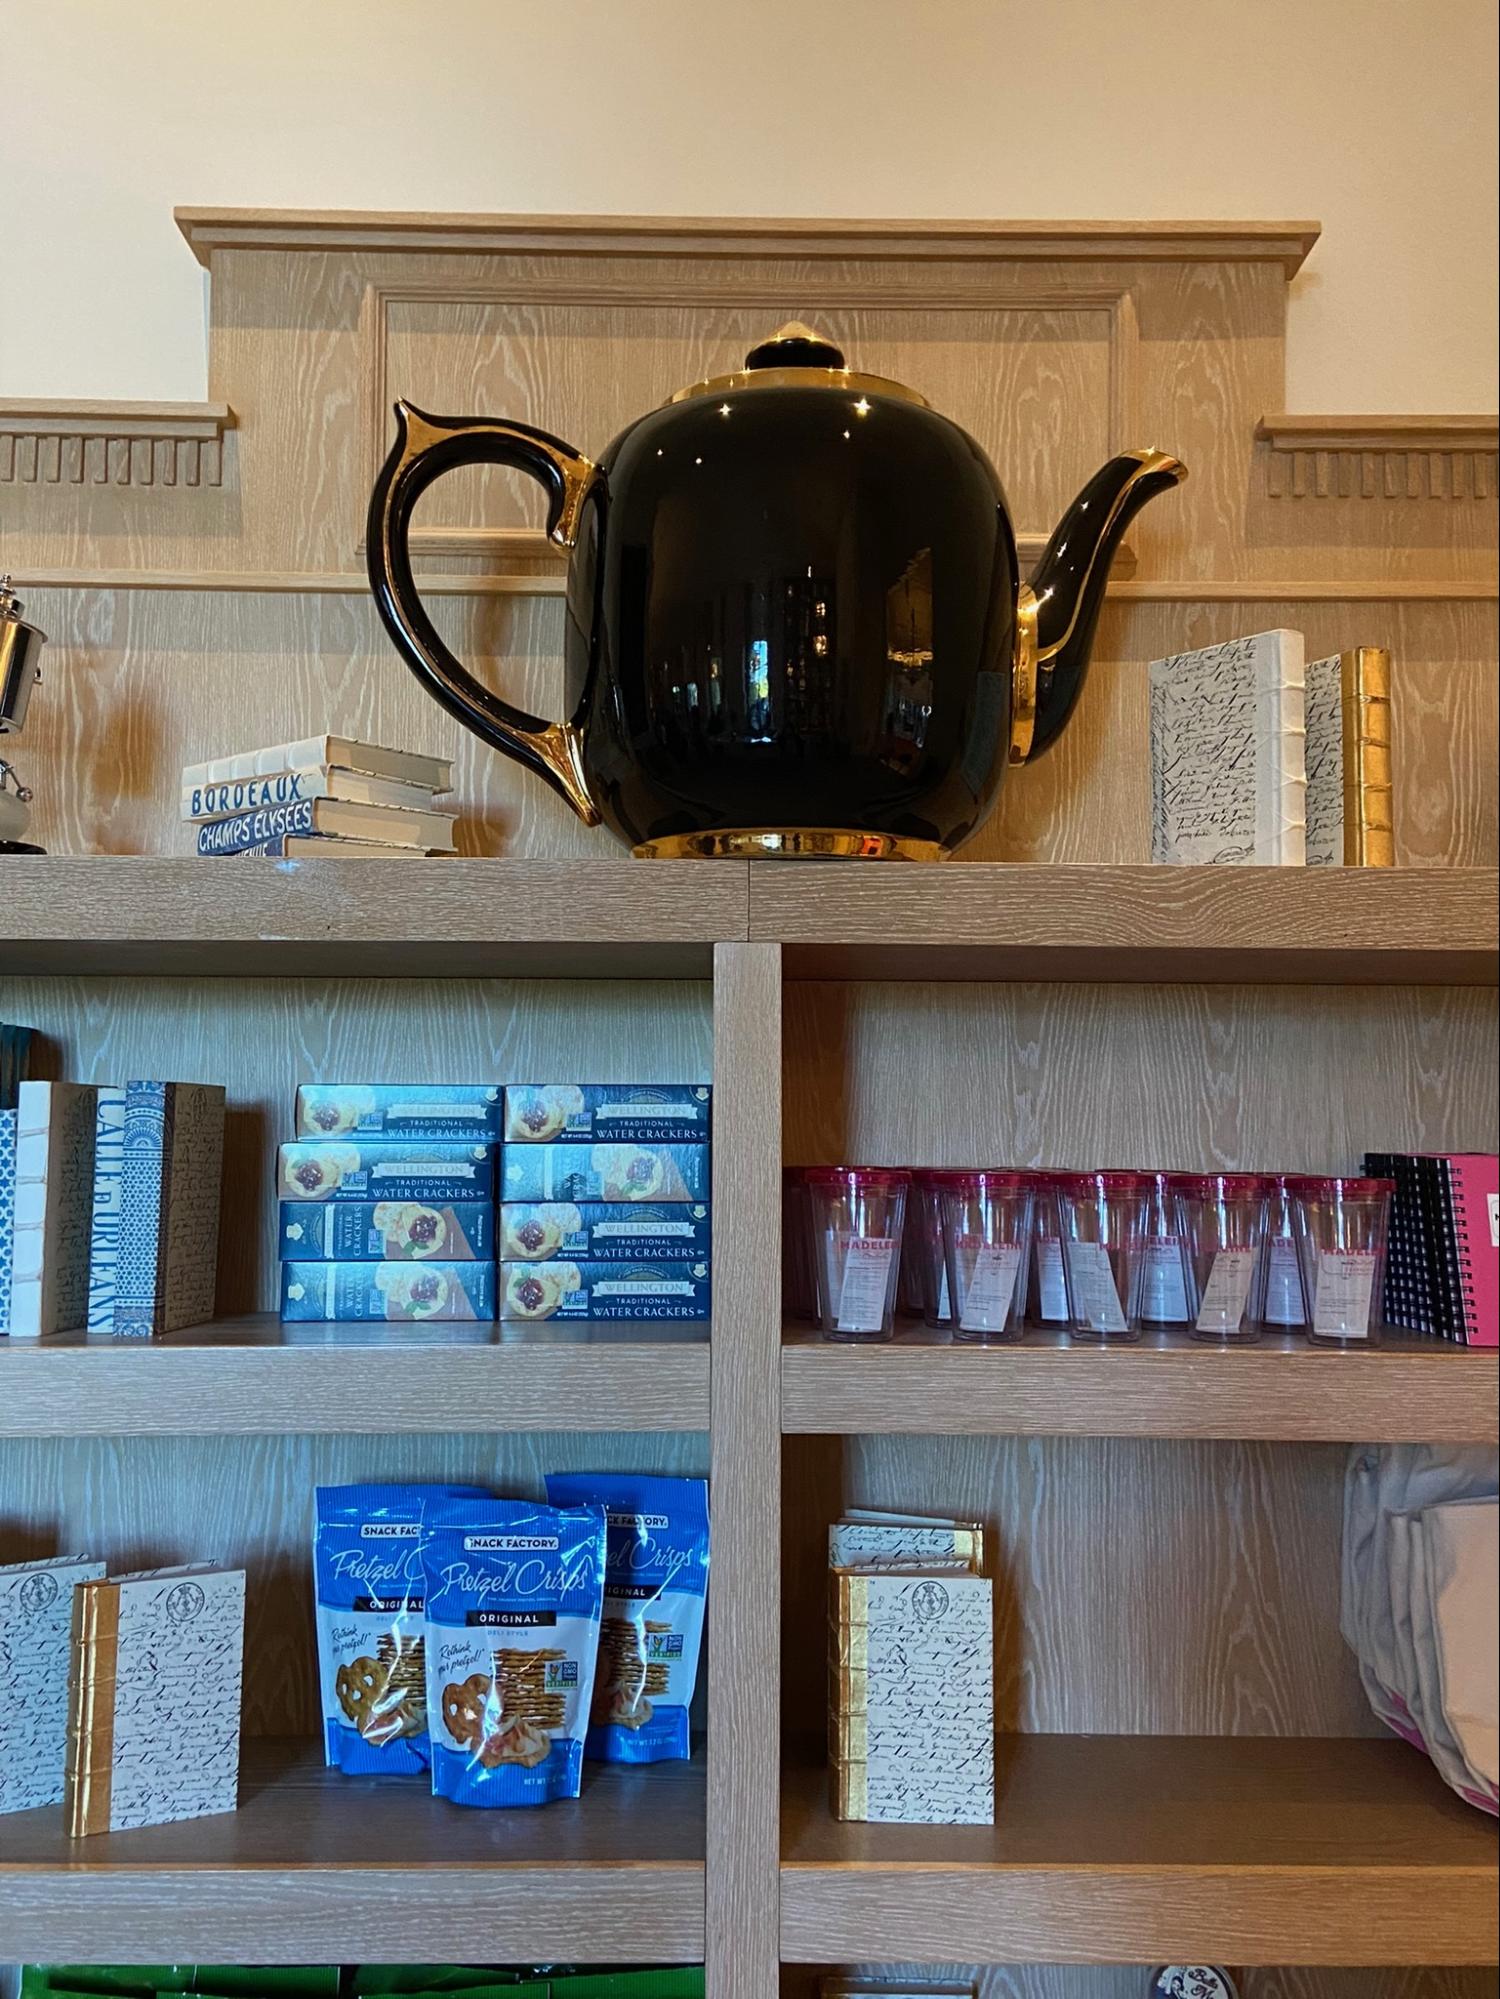
Photo credit: MetaphorDesign.com, Location: Cafe Madeleine at Baha Mar, Bahamas
Wood Highlights: Flat edge Moulding, stepped, placed at top of bookcase with dentil moulding
Top Moulding: Elevating the Design
Adding wood moulding to the top of your shelves brings a high-end, furniture-like finish to any shelving unit. Whether you’re styling a new built-in bookcase or existing shelves, a well-placed top moulding creates a refined, intentional design.
•Crown Moulding provides a seamless transition between shelving and ceiling, giving your space a polished and classic feel.
•Cove Moulding is a softer alternative, featuring a concave curve that adds an elegant yet understated touch.
•Step Moulding layers different trims together for a bold, architectural effect that makes a statement.
Adding top moulding ensures that your shelving doesn’t just look like utilitarian storage—it looks like part of the room’s overall ambience and design. Place moulding above each section for rhythm and symmetry or in the center for a hierarchical move.
Bottom Area Moulding: Grounding the Shelving for a Built-In Look
Shelving that extends to the floor or sits on cabinetry benefits from bottom moulding that ties it into the surrounding architecture. Some great options include:
•Baseboard Moulding to connect floor-to-ceiling shelving with adjacent trim for a seamless, built-in effect.
•Apron Moulding just beneath the lowest shelf higher than a baseboard to create a sophisticated, furniture-like effect.
•Toe Kick Moulding to elevate the shelving slightly off the floor for a polished, cabinetry-inspired touch also stops the dust and is a modern approach which can make the shelving unit appear to float and not be connected to the wall.
Bottom moulding when placed equal to the shelf above or stepped forward ensures that shelving feels grounded and integrated into your space rather than looking like a standalone unit.
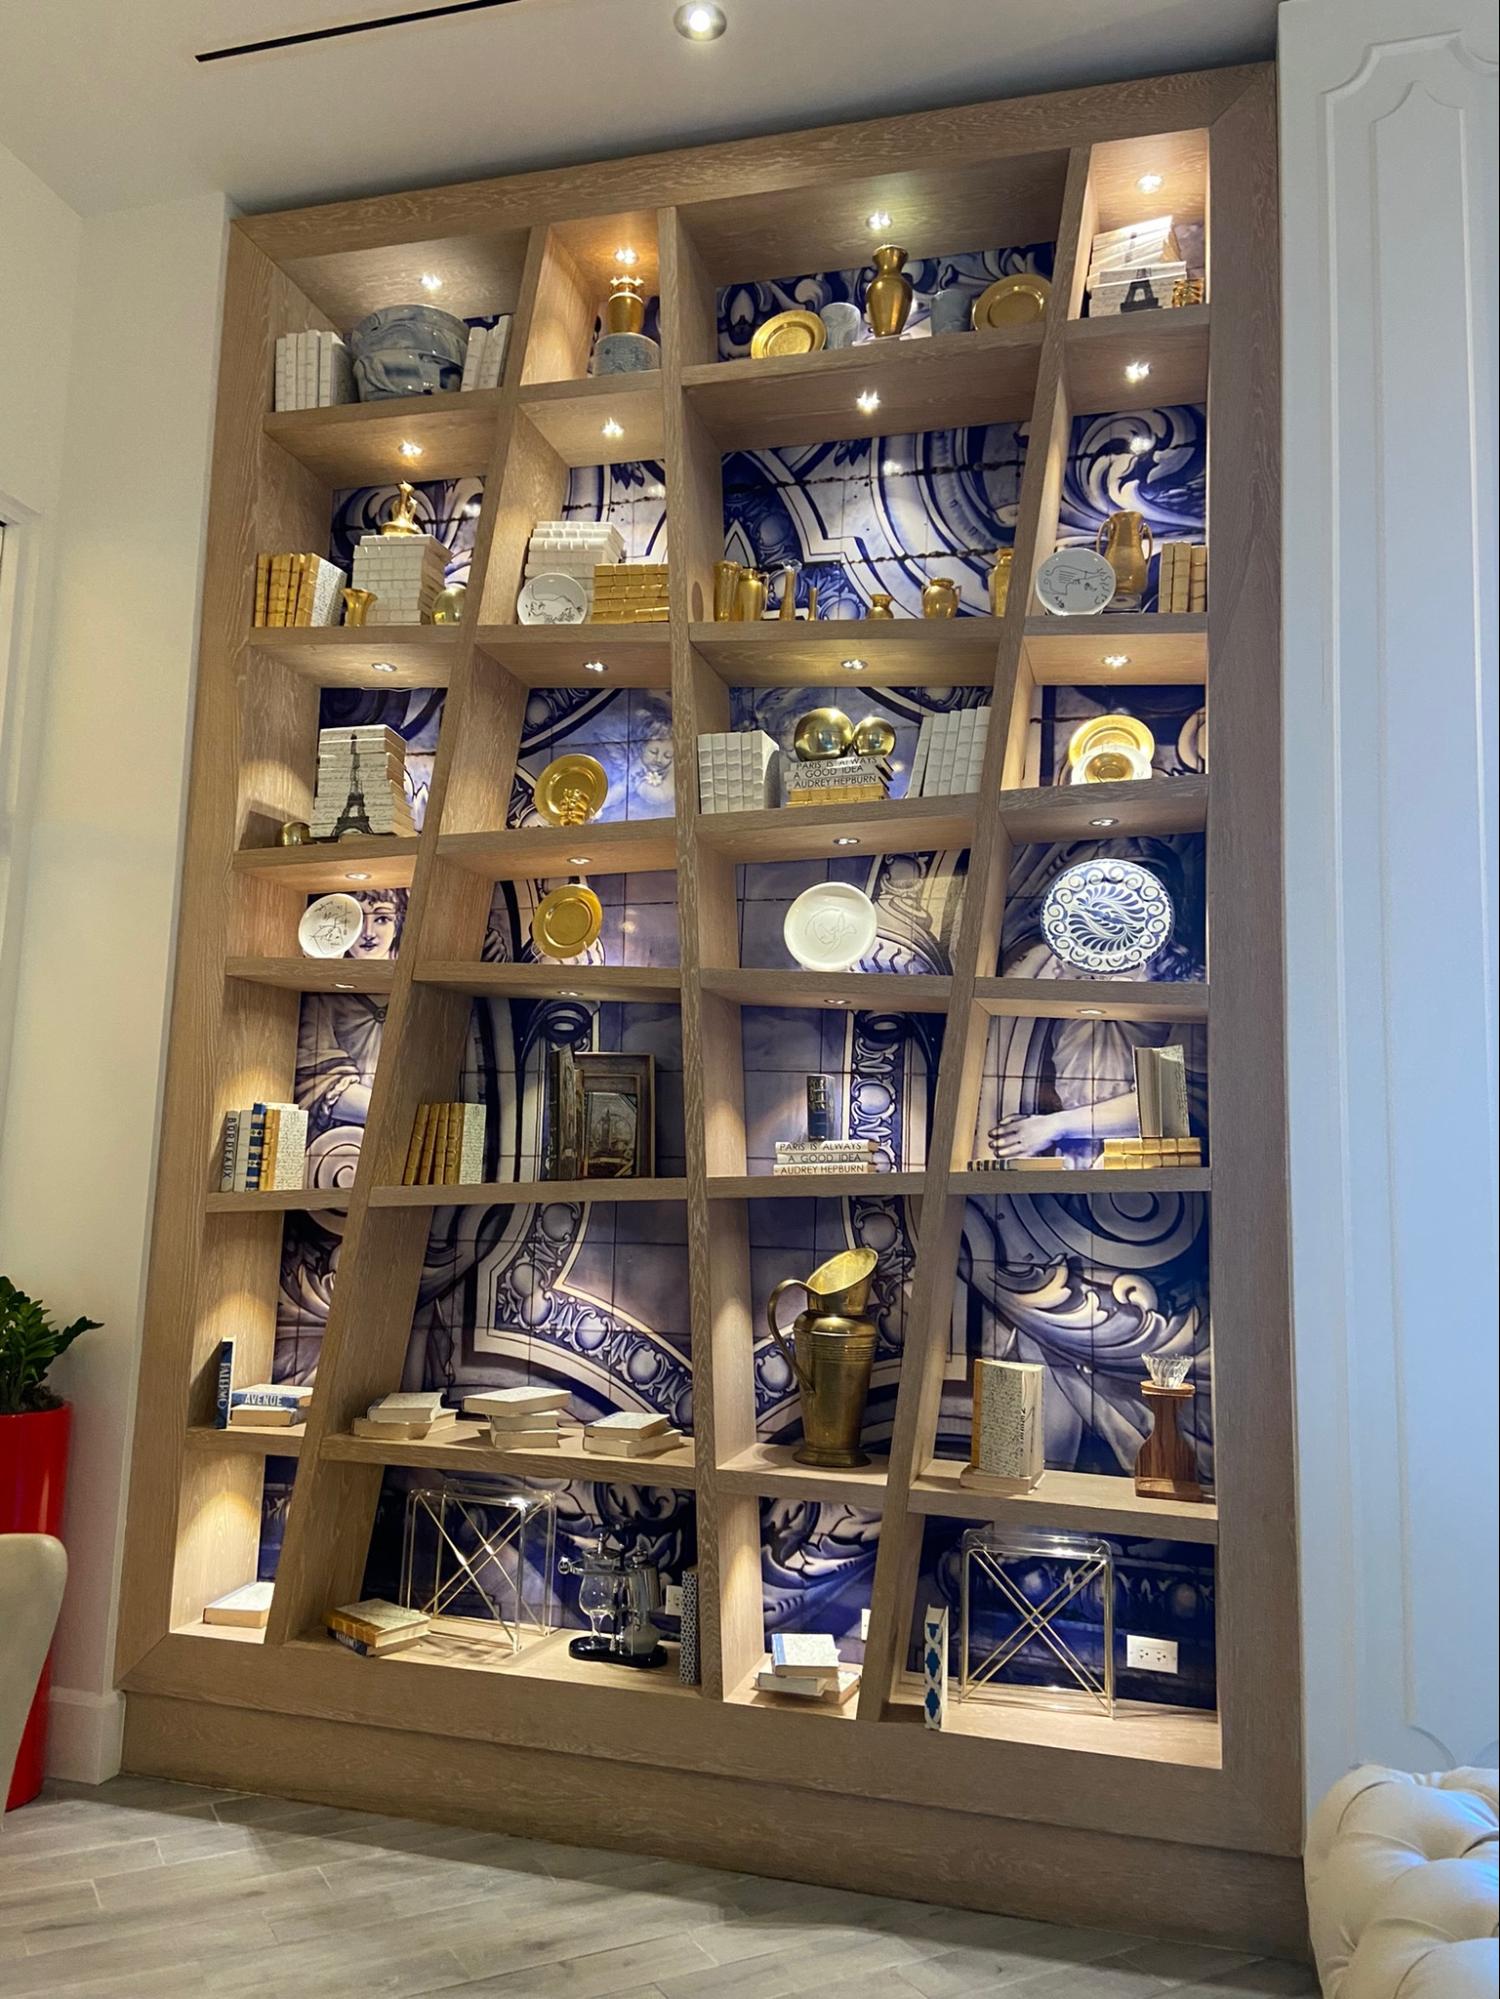
Photo credit: MetaphorDesign.com, Location: Cafe Madeleine at Baha Mar,
Wood Highlights: S4S horizontally and vertically placed, butted, framed at the perimeter and mitered, with baseboard moulding, and a tiled back wall
Framing the Bookcase: A Bold, Architectural Look
For a custom, high-end aesthetic, consider framing the entire bookcase with moulding. This design technique makes shelving look intentional, substantial, and fully integrated into the space.
•Mitered Corners provide a professional, polished appearance by connecting moulding seamlessly around the edges.
•Layered Moulding combines flat trim, crown, or ogee pieces for depth and dimension.
•Inset Moulding inside the frame adds an extra layer of detail, mimicking paneled millwork.
A fully framed bookcase enhances the overall design and makes it feel like part of the home or store’s architecture rather than an afterthought.
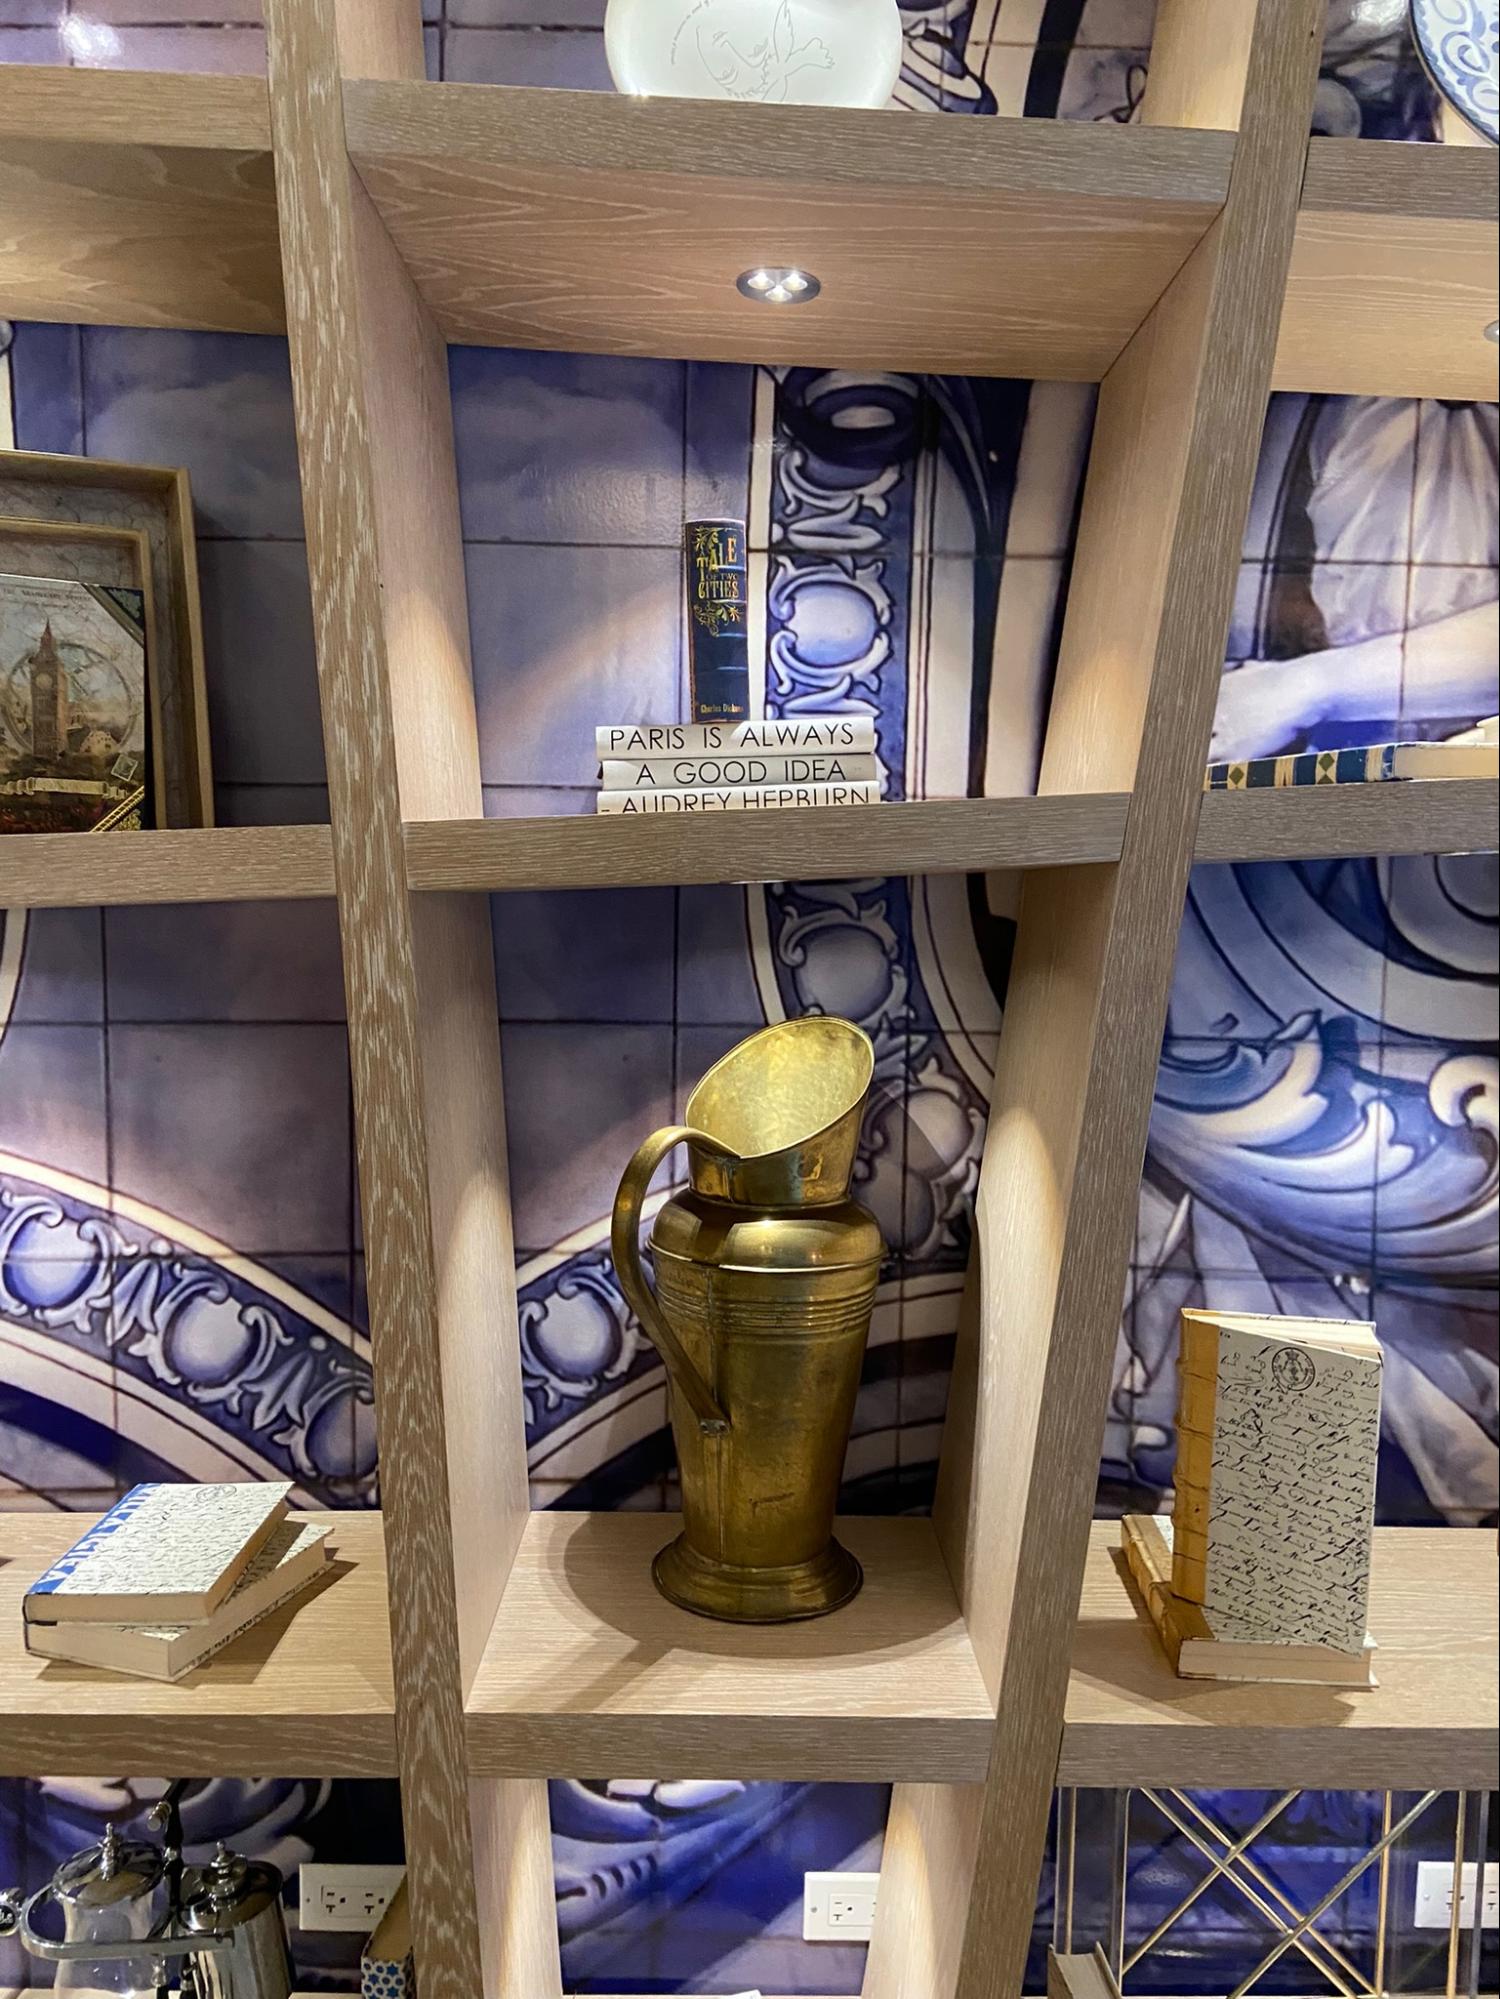
Photo credit: MetaphorDesign.com, Location: Cafe Madeleine at Baha Mar,
Wood Highlights: Custom white oak S4S in front of tile
Photo credit: MetaphorDesign.com, Location: Todd Snyder, Marin County, California,
Wood Highlights: Flat eased edge oak moulding at edge of custom S4S shelving at front and back with fabric wall covering, offset edges, and crown moulding above
Back Panel Moulding: Texture & Depth That Transforms Shelving
Another impactful way to enhance shelving is by adding moulding to the back panel. This small step creates depth, texture, and interest, making your bookshelves feel intentional and styled.
•One by one wood spaced evenly across the back brings contemporary appeal, perfect for modern or coastal-style interiors.
•Picture Frame Moulding applied in a grid pattern gives a built-in, paneled effect for added sophistication. Place overlapping with wallpaper, fabric or tile at the back of shelving where edges meet for a layered, maximalist look.
•Shiplap introduces horizontal or vertical lines that add a casual yet sophisticated feel, perfect for farmhouse yet also for contemporary spaces.
•Contrast Paint or Stain on moulding highlights the moulding details, making the shelving’s backdrop a focal point.
These techniques turn bookshelves into a feature element, making books, decorative objects, and collectibles stand out beautifully.
Photo credit: MetaphorDesign.com, Location: Todd Snyder, Marin County, California,
Wood Highlights: Flat eased edge moulding at edge of S4S shelving at front and back with wallcovering fabric, offset edges, and crown moulding above.
Upgrade Your Display with Chic Shelf Moulding Today
Shelving should be more than just a storage solution—it should be a celebratory design statement. Whether you’re opting for a clean, contemporary edge, dramatic crown detailing, or vertical dividers for added structure, S4S and moulding has the power to elevate your shelfie space and create a polished, bespoke look.
Ready to transform your shelves? Visit the Lowpensky Moulding catalog today, and find our S4S – surfaced 4 sides – material (great for building your shelves), discover moulding styles for all your edges, back area trimming, and order the perfect set for your chic shelving project! The sky, with your imagination, is the only limit with Lowpensky Moulding materials.
Photo credit: MetaphorDesign.com, Location: Goop, Marin County, California
Wood Highlights: Matching trim at white oak shelving and painted T&G
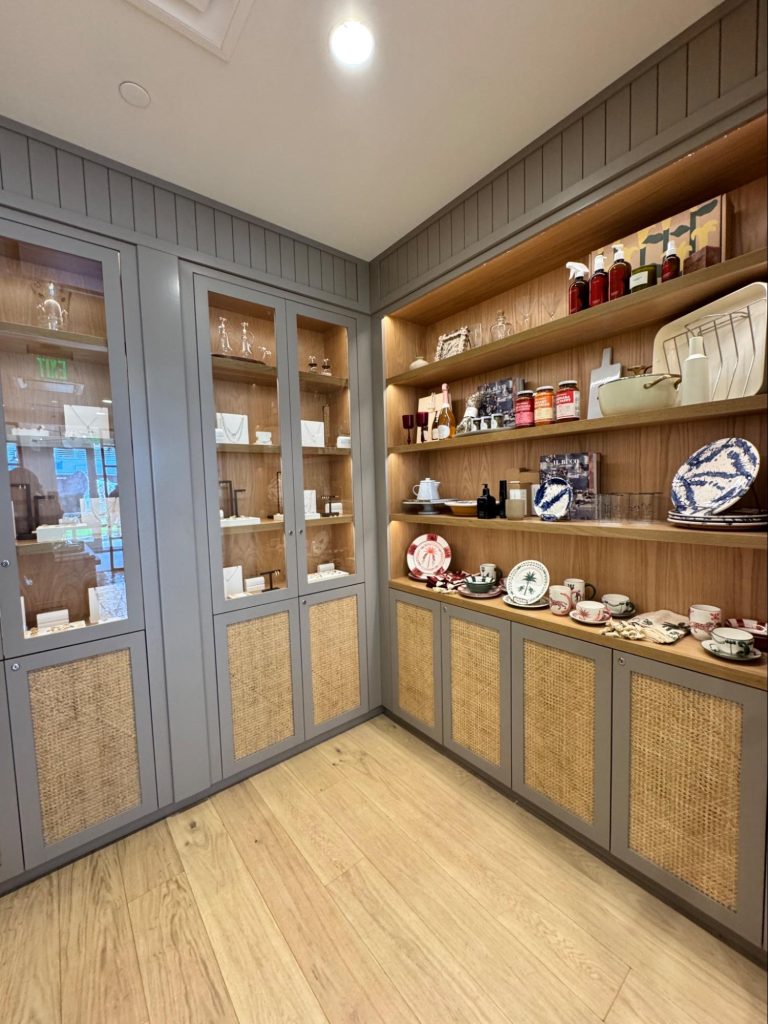
Photo credit: MetaphorDesign.com, Location: Goop, Marin County, California,
Wood Highlights: Trim at shelving with lighting
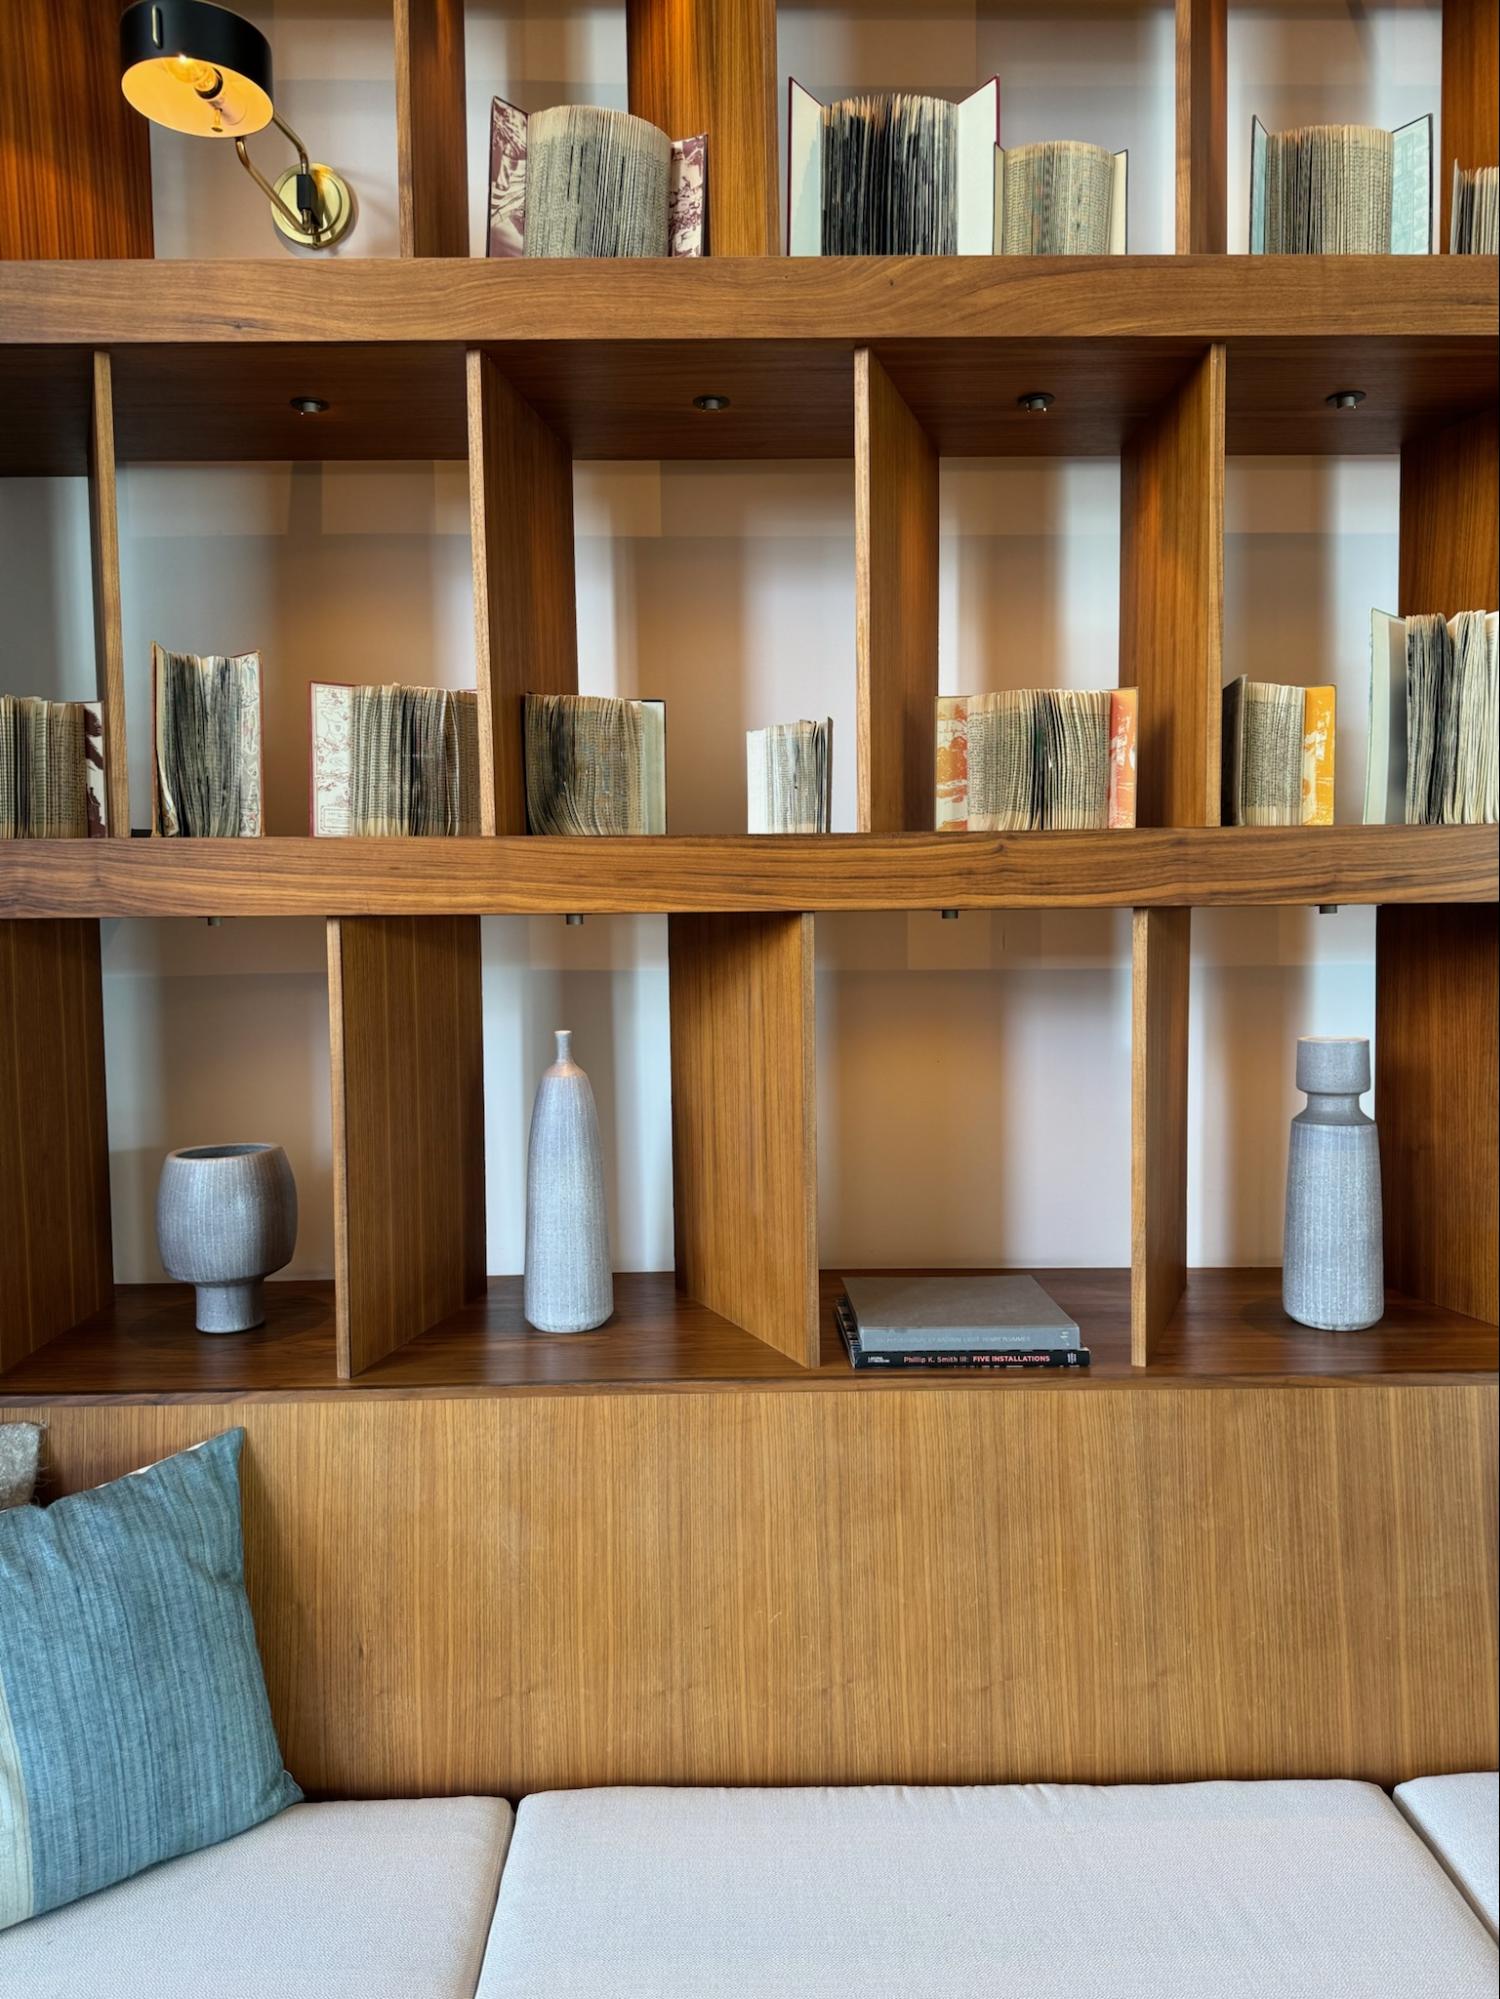
Photo credit: MetaphorDesign.com, Location: The Rowan, Palm Springs, California,
Wood Highlights: S4S shelving, eased edge trim at face of shelving

Photo credit: MetaphorDesign.com, Location: The Rowan, Palm Springs, California,
Wood Highlights: Flat edge moulding placed horizontally with shelves for a midcentury contemporary style
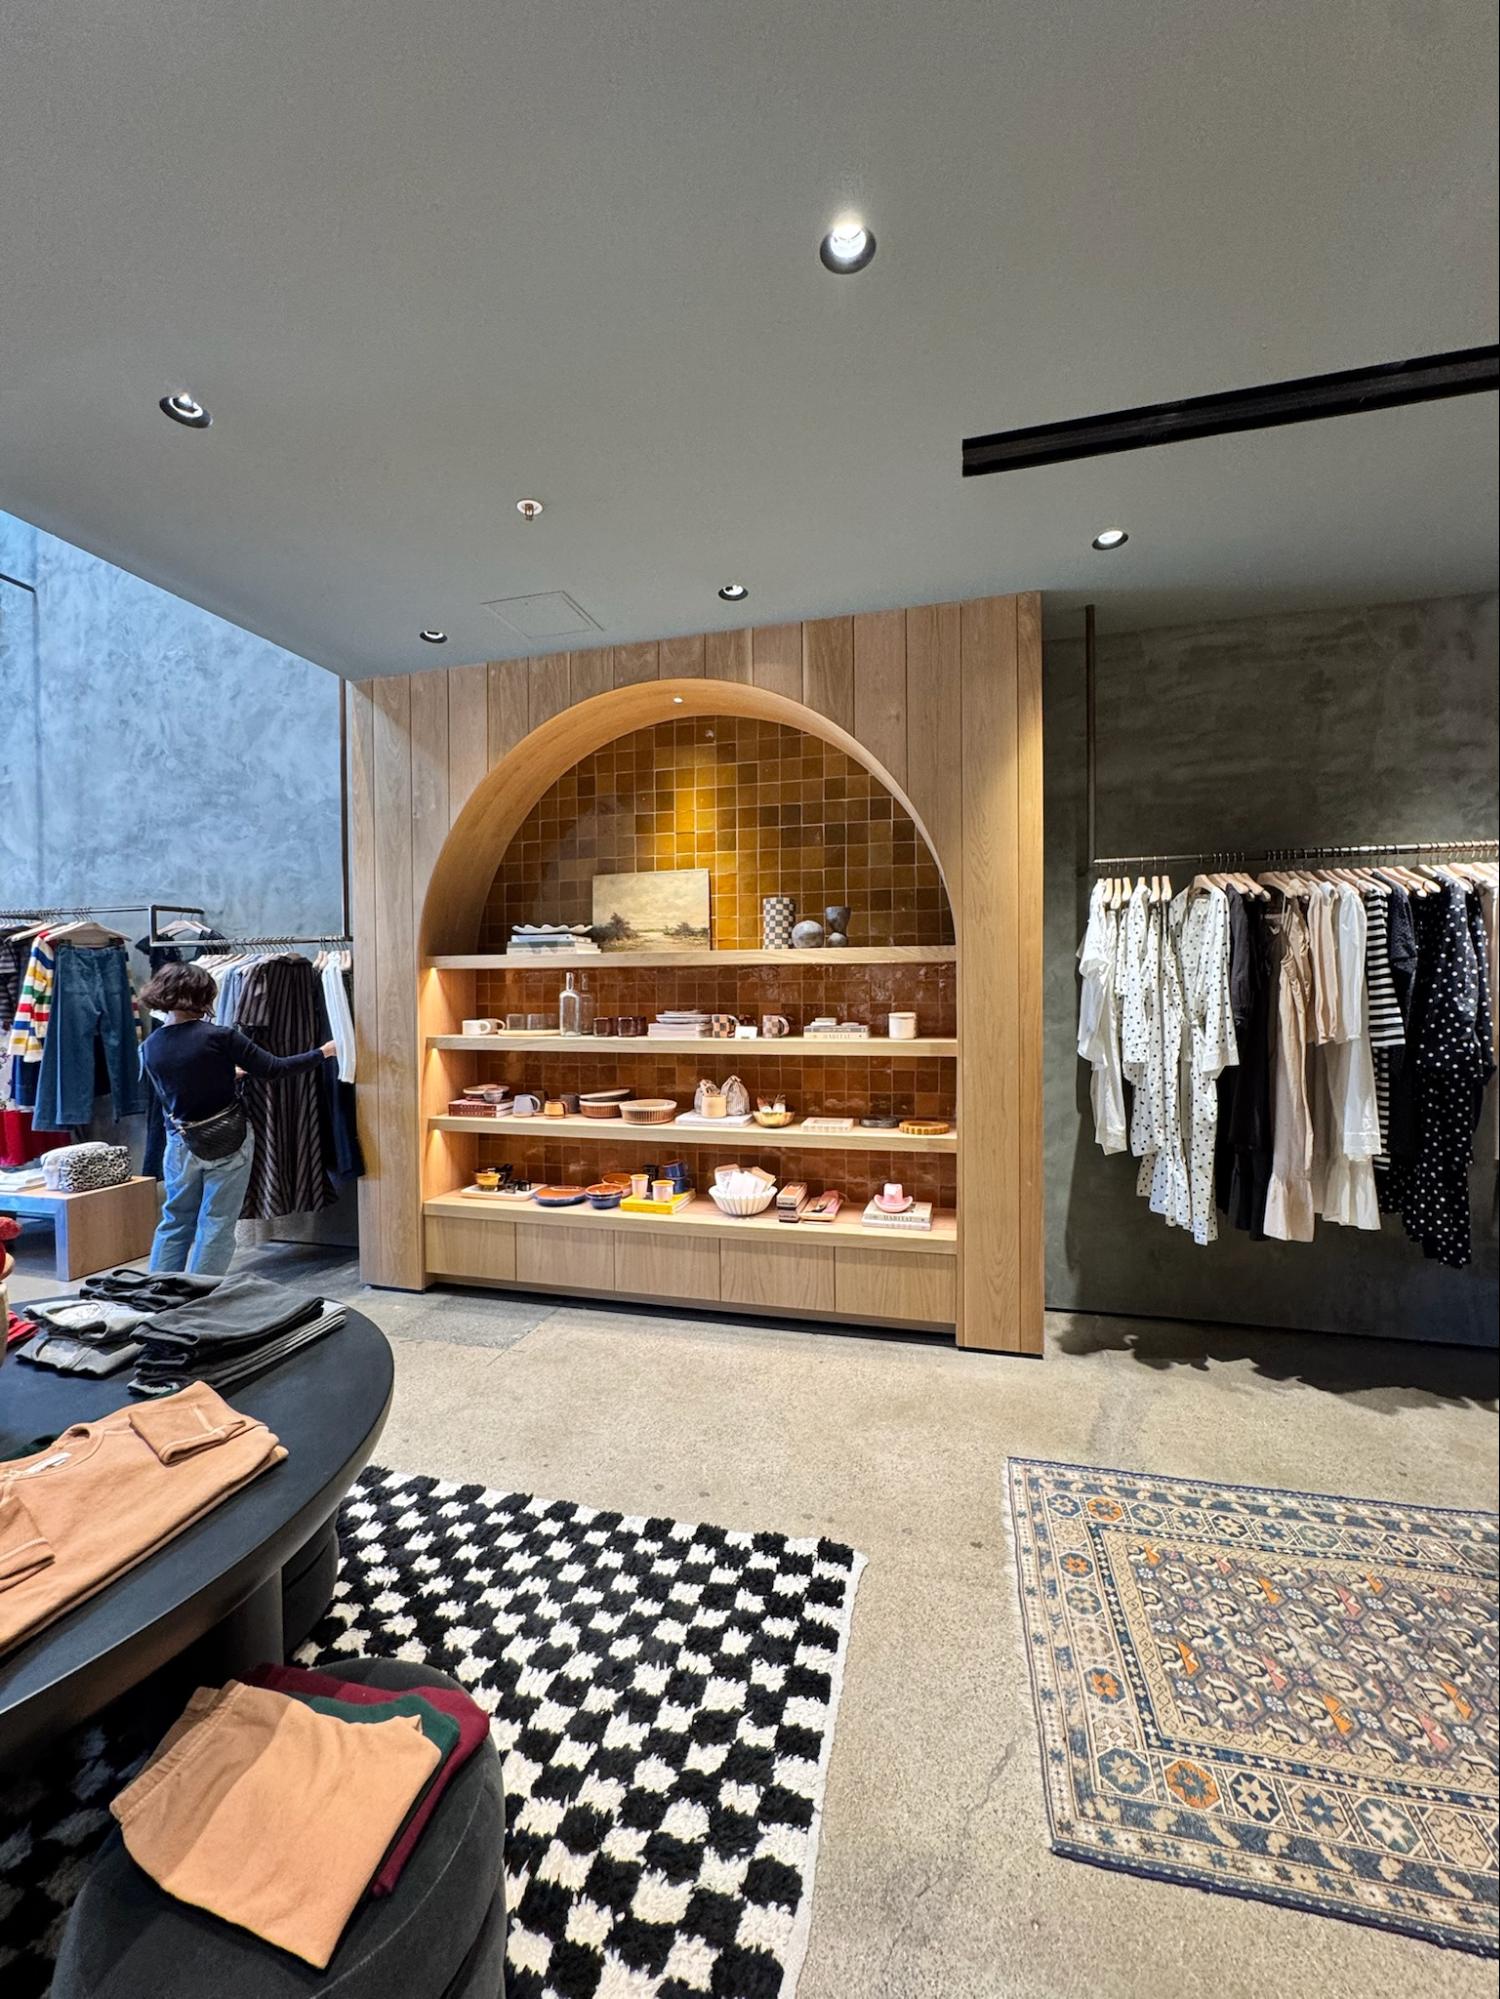
Photo credit: MetaphorDesign.com, Location: The Great,
Wood Highlights: T&G vertically placed, flat eased edge moulding at edge of S4S shelving, with tiled back wall
Photo credit: MetaphorDesign.com, Location: Mercado, Cabo San Lucas, Baja, California
Wood Highlights: S4S and eased edge trim form cubes with trimmed millwork surround
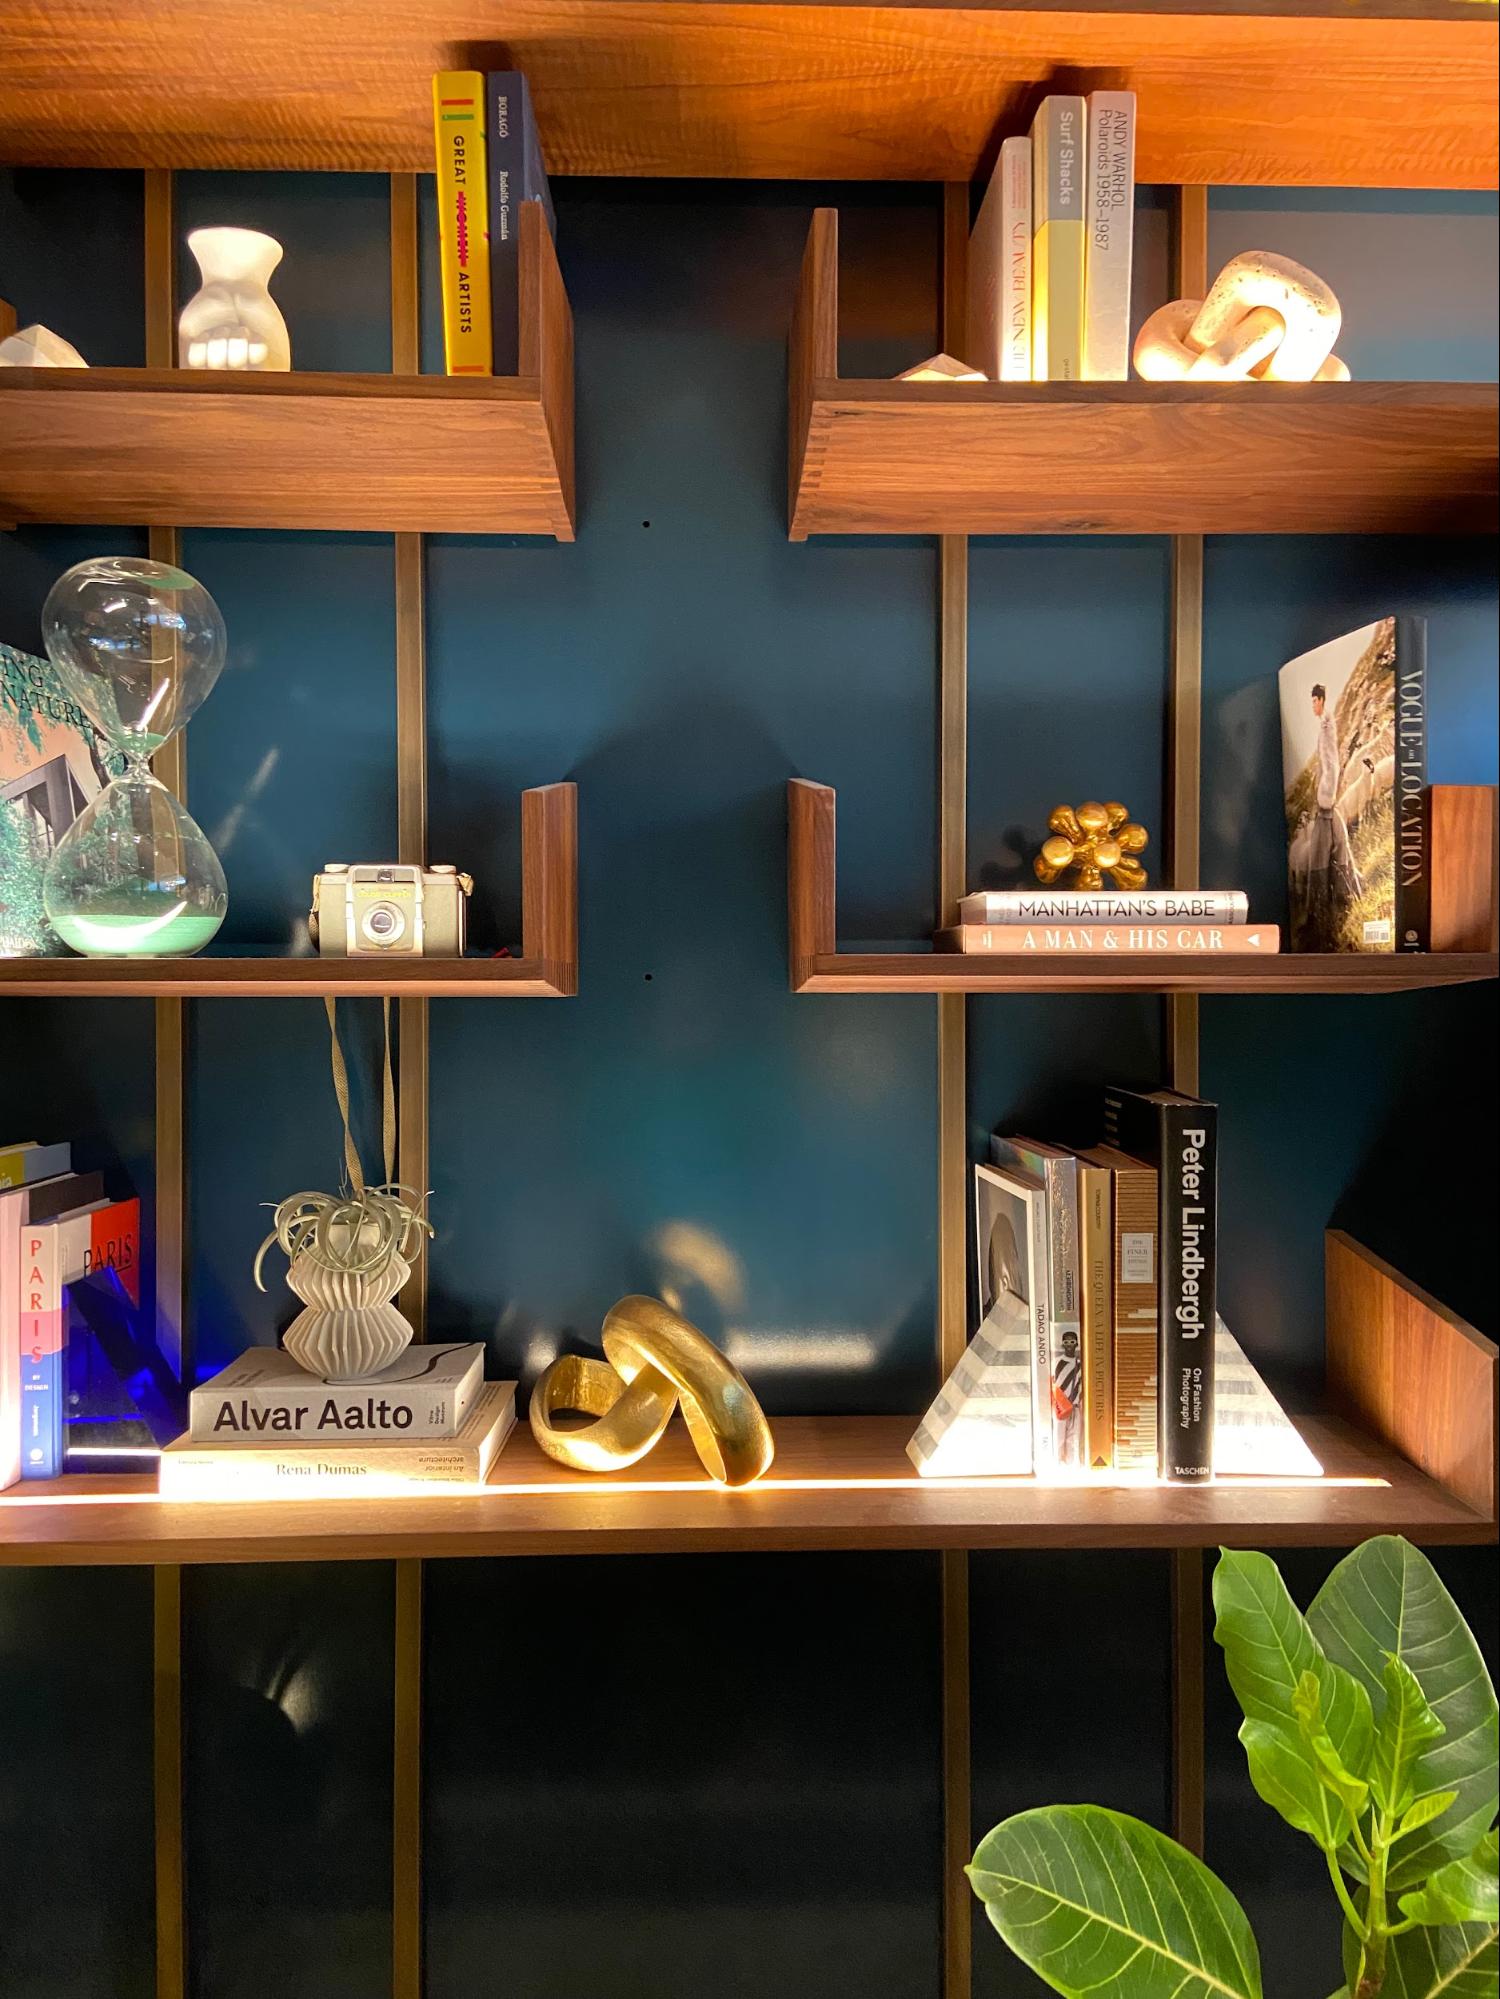
Photo credit: MetaphorDesign.com, Location: Hospitality Project, NY, NY,
Wood Highlights: S4S Shelving, with finger joints, groove light pocket
Photo credit: MetaphorDesign.com, Location: Copperfield Books, Marin County, California,
Wood Highlights: Knotty pine trim at shelving and at crown and base
Photo credit: MetaphorDesign.com, Location: The Ben, West Palm Beach, Florida,
Wood Highlights: Moulding trim curved profile at shelving
Photo credit: MetaphorDesign.com, Location: Monkey Bar at SLS Baha Mar, Nassau, Bahamas, Wood Highlights: Duo painted trim at shelving

Photo credit: MetaphorDesign.com, Location: Todd Snyder, Marin County, California,
Wood Highlights: Trim at S4S shelving with crown moulding profile at top
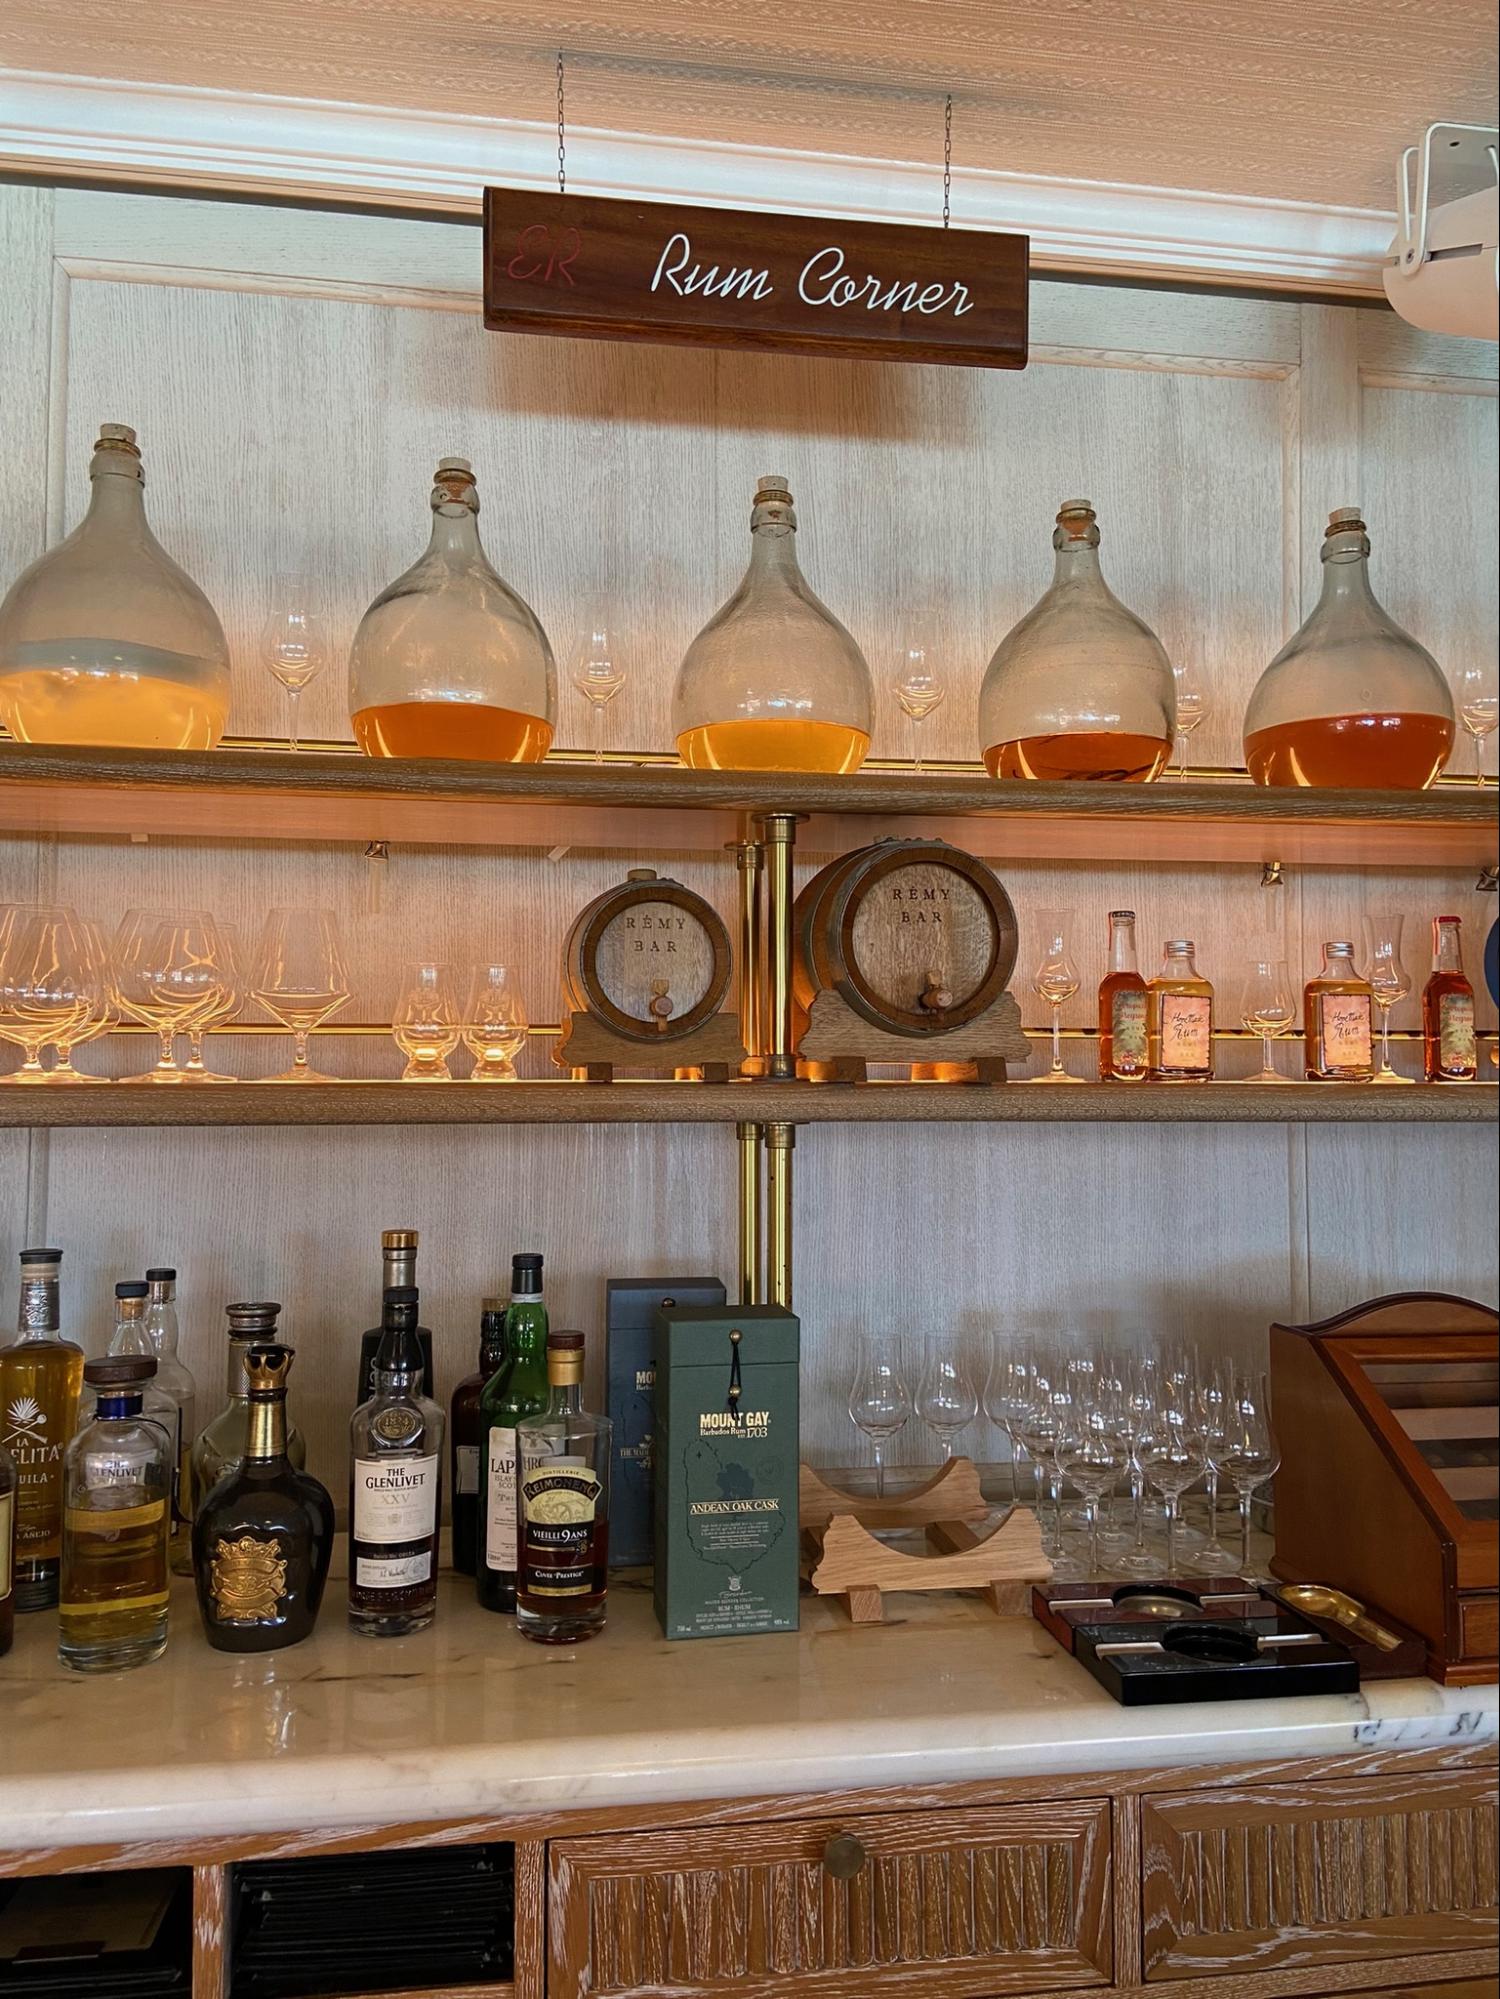
Photo credit: MetaphorDesign.com, Location: Remy Bar, Eden Rock Restaurant
Wood Highlights: S4S Bullnose shelving with trimmed panelling beyond
Photo credit: MetaphorDesign.com, Location: Monkey Bar at SLS Baha Mar, Bahamas,
Wood Highlights: Trim at S4S shelving with mirror back
Photo credit: MetaphorDesign.com, Location: SLS at Baha Mar, Wood Highlights: Trim at S4S shelving with fluted wood at back
Photo credit: MetaphorDesign.com, Location: The Hoxton Williamsburg, Brooklyn, NY
Wood Highlights: Trim at floating wood shelves with tile back
DISCLAIMER
The information in this article is provided solely for general informational purposes and does not constitute professional, technical, legal, or regulatory advice. Codes, permitting requirements, and construction standards vary by jurisdiction. Consult a licensed architect, engineer, contractor, professional designer, and your local building authorities before beginning any project. Lowpensky Moulding assumes no responsibility or liability for actions taken based on the content of this article.